How to carve on a snowboard – Trick tip
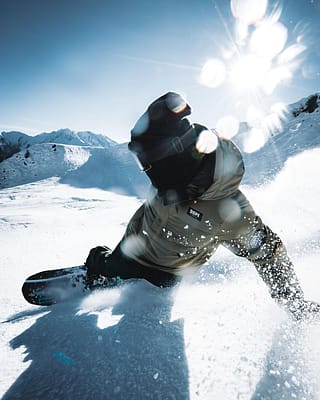
Is there anything that looks as slick and cool as a sharp carve on a snowboard? But how do you carve on a snowboard like a pro? Don't worry, we have you covered in this instalment of trick tips.

There is no better way to prepare mentally for the new season than watching spellbinding trick tips and getting hyped to expand your snowboarding game to impress your friends.
Carving is more than just looking stylish on the slopes; it's a fundamental skill that enhances edge control, stability, and speed management. Whether you’re an aspiring freestyle rider or an all-mountain snowboarder, carving lays the groundwork for mastering bigger tricks like jumps, rotations, and even halfpipe riding
To get the winter feeling going, grab your snowboarding jackets and snowboarding pants from the basement, get cozy on the couch, and enjoy the read.
Our five-week series's first topic is carving on a snowboard. You may ask yourself why we are doing a trick tip on carving. Well, there is mainly one reason: Carving is AWESOME! It does not only help you to improve your all-mountain riding, but it also sets the base for kicker jumping and pipe riding.

Carving has been pretty much forgotten about since the hype of freestyle snowboarding started, but it is experiencing a major comeback. Yes – Carving is cool again! To convince yourself about what I just said, take an extra minute of your time and watch this 4-minute masterpiece of the creative minds of Korua Shapes.
Carving explained step-by-step
Now that you saw, how amazingly beautiful Carving can look, let’s dig a bit deeper into the technical aspects of it. The following video of our friends over at snowboard-addiction.com is a great help when learning or when trying to improve your carving.
We broke down the tutorial into a step-by-step guide for carving on a snowboard:
Step 1: Edge stacking
If you miss feeling your snowboard under your feet, you can try this one at home. Jump into your boardshorts, strap on your board and get comfy on the living room carpet. Carving is all about edge control. Edge Stacking will therefore help you to develop a better feeling for the edges of your board and how to control them when trying this out on the slope.
To do a (indoor) frontside carve, try pushing your shins towards your boots and shifting your hip forward while bending your knees. Hold on to the wall or a chair to not fall over.
To do a (indoor) backside carve, try sinking your hips down towards the highbacks of your bindings and lifting your toes while getting low on your knees. Try to hold onto something to not fall over.
If you feel comfortable doing this, try balancing the board on the toe-edge or the heel-edge without holding onto something. This will do wonders when trying it out on the slope! These drills train your muscle memory, making it easier to maintain balance and engage edges properly once you're on actual snow
Step 2: Engage edge
Change of season: This step is for the wintertime. If you can remember all the exercises you did in the summer, you will have an easy time transferring your knowledge onto the slopes! Start trying to engage your edge on a flat run with no crowds. You will need some space to practice your first carving turns, trying to traverse the slope. The movement is the same as the one you practiced inside – just without holding onto the wall. Try to fully engage your toe-edge when front-side turning and fully engage your heel-edge when backside turning. Ensure your knees are slightly bent and your weight is centered over your board to maintain control. Avoid leaning too far forward or backward, as this can cause skidding rather than true carving. When the base of your board is not touching the slope, you know that you are doing a good job!
Step 3: Edge roles
Once you feel secure to traverse the slope on both your toe edge and your heel edge, you can start trying to roll from edge to edge while riding tighter turns. Your upper body is staying relatively still. As you increase speed, your turns will become more dynamic. Adjust your edge pressure gradually rather than making sudden shifts, which can cause instability. The movement for edge rolling comes mainly from your legs and toes. To control your progress, you can check if the lines in the snow are thin, drawn-out lines with a clear contour.
Step 4: Mellow run
Start practicing your carving game on a mellow long run with small crowds. When carving, you should get a much steeper angle on your turns than on a regular turn. When riding out your turns, you should almost be able to reach an 90 degree angle towards the hill on both edges. Your arms and shoulders will help you change from one edge to the other by leading in the direction of where you want to go. One common mistake is relying too much on arm movement rather than leg engagement. Keep your upper body stable and let your legs and edges do most of the work.
Step 5: Steeper run
As soon as you feel comfortable to carve on mellow runs, try to adapt it to a steeper run. On steeper terrain, ensure your weight is slightly forward to maintain control. The more aggressively you press into your edges, the tighter and more responsive your carves will be.

“Commitment is key. If you are going to engage in a turn or a really cool euro carve, go all in. If you only give half your energy the carve will not only look bad but you aren’t pushing yourself. Just go for it and enjoy the ride”
Wrapping up
Once you nailed your first carves, you will get hooked. It’s like flying on a snowboard. Ignoring the laws of physics. Going fast and forgetting about everything that is surrounding you. And a good carve will set you up for your next steps on a snowboard: jumps, jibs and rotations. So what are you waiting for? Strap on your board, get our there and carve from one edge to the other until your legs burn. With consistent practice, your carves will become deeper, smoother, and more effortless. Keep pushing yourself, and soon, carving will feel as natural as gliding on fresh powder.
In this sense, we hope you liked this weeks’ trick tip and we will be back next week for you with a trick tip on how to jump on a snowboard, followed by how to jib, rotate and how to ride powder on a snowboard. If you are keen on keeping your skills fresh during the summer months, make sure to check out our Ultimate Guide to Indoor Skiing and Dry Slopes in the UK. Until next time: stay tuned and enjoy the sun.
You may also be interested in

